> For the complete documentation index, see [llms.txt](https://docs.higiocloud.vn/llms.txt). Markdown versions of documentation pages are available by appending `.md` to page URLs; this page is available as [Markdown](https://docs.higiocloud.vn/hi-gio-draas/how-to-use-vcda-on-premises.md).
# How To Use vCDA On-Premises
## **Overview**
This short manual guide is designed to help HI GIO users navigate
* *How to create a Migration Job*
* *How to create a Protection Job*
* *How to Test Failover, Failover, Reverse, or Migrate*
## **Procedure**
{% tabs %}
{% tab title="1. How to create a migration job" %}
* Configuring a migration allows later migrating a vApp or a virtual machine to a remote organization and running the workload in the destination site
* The target recovery point objective **(RPO)** for a migration is **24 hours**
* If you log in to VMware Cloud Director Availability **On-Premises** Appliance, then :
* **Outgoing Replications** are replication and failover VM from the on-premises vCenter Server to a cloud site
* **Incoming Replications** are replication and failover VM from the cloud site to the on-premises vCenter Server
* If you login to VMware Cloud Director Availability **Tenant Portal** (provided by Services Provider) then :
* **Incoming Replications** is replication and failover VM from the on-premises vCenter Server to a cloud site
* **Outgoing Replications** are replication and failover VM from cloud site to on-premises vCenter Server or Cloud to Cloud
* In the left pane, choose a Replication Direction – Choose **Outgoing Replication** – Create **New Migration**
* Select the VMs you want to migration by checking the corresponding box(es). Click **Next**
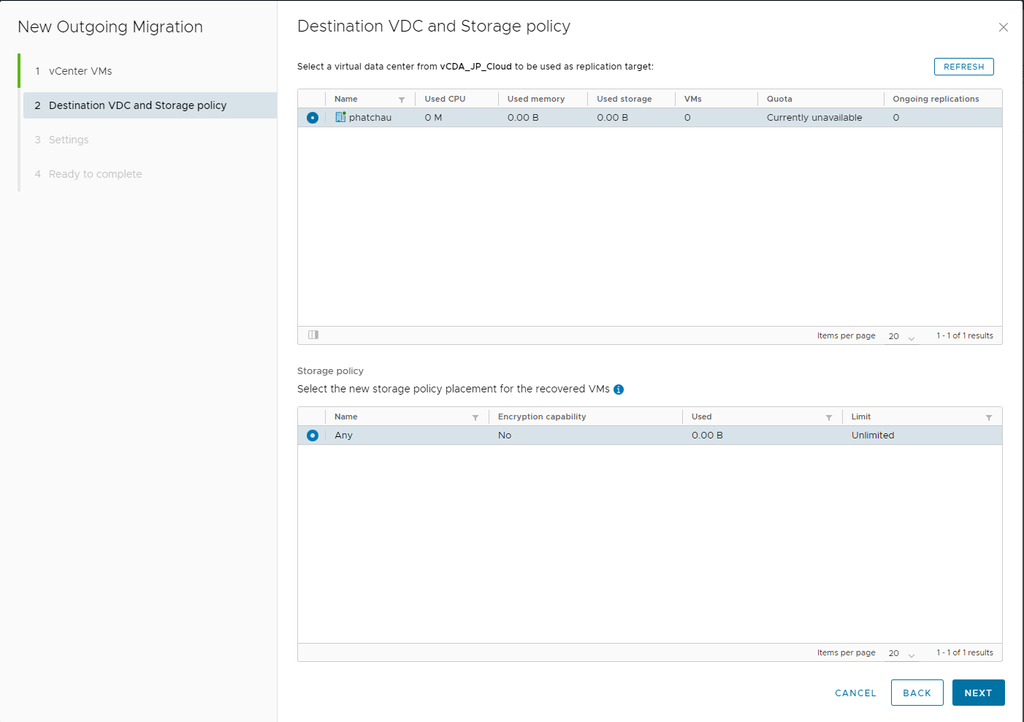
* On **the Destination VDC and Storage** policy page, select the virtual data center for the replication destination and the storage policy for placing the recovered virtual machines, and click **Next**.
* On the Settings page, configure the following replication settings and click **Next**
* To apply compression on the replication data traffic for reducing the network data traffic at the expense of CPU, leave **Compress replication traffic** selected
* To start the replication when the wizard finishes, leave **Delay start synchronization** deselected. Alternatively, to schedule the start of the replication, select it and enter the local date and time for starting the replication
* From the **VDC VM placement policy** drop-down menu, select an organization VDC placement compute policy for the recovered virtual machines
* *(Optional)* To select specific hard disks of the virtual machines for replicating to the destination site for reducing the replication data network traffic, select **Exclude disks**
* *(Optional)* To select a previous copy of the virtual machines in the destination site for reducing the replication data network traffic, select **Configure Seed VMs**
* If you selected **Exclude disks**, on the **Replicated Disks** page select the virtual machine disks for replicating and click **Next**
* On the **Ready to complete** page, verify that the replication settings of the migration are correct and click **Finish**
* After the replication finishes, for the vApp and its virtual machines in the **Replication type column**, you see a **Migration** state
{% endtab %}
{% tab title="2. How to create a protection job" %}
* Configuring a protection allows protecting a vApp or a virtual machine from one organization to another, while keeping the workload running in the source site. If the source site is unavailable, after a successful replication you can fail over and power on the source virtual machine in the destination site
* If you login to VMware Cloud Director Availability **On-Premises** Appliance then :
* **Outgoing Replications** is replication and fail over VM from the on-premises vCenter Server to a cloud site
* **Incoming Replications** is replication and fail over VM from cloud site to on-premises vCenter Server
* If you login to VMware Cloud Director Availability **Tenant Portal** (provided by Services Provider) then :
* **Incoming Replications** is replication and fail over VM from the on-premises vCenter Server to a cloud site
* **Outgoing Replications** is replication and fail over VM from cloud site to on-premises vCenter Server or Cloud to Cloud
* In the left pane, choose a Replication Direction – Choose **Outgoing Replication** – Create **New Protection**
* Select the VMs you want to protect by checking the corresponding box(es). Click **Next**
* On **the Destination VDC and Storage** policy page, select the virtual data center for the replication destination and the storage policy for placing the recovered virtual machines, and click **Next**.
* To set the SLA settings of the replication, select any of the preconfigured SLA profiles. Click **Next**
* From the **VDC VM placement policy** drop-down menu, select an organization VDC placement compute policy for the recovered virtual machines
* *(Optional)* To select specific hard disks of the virtual machines for replicating to the destination site for reducing the replication data network traffic, select **Exclude disks**
* *(Optional)* To select a previous copy of the virtual machines in the destination site for reducing the replication data network traffic, select **Configure Seed VMs**
* To manually configure the SLA settings, select **Configure settings manually**
* **Target recovery point objective (RPO):** If you selected Configure settings manually, set the acceptable period for which data can be lost if there is a site failure by using the slider or by clicking the time intervals. The available RPO range for a protection is from one minute to 24 hours
* **Retention policy for point in time instances:** If you selected Configure settings manually, to preserve multiple rotated distinct instances to which the virtual machines can be recovered, select this option, select the number of replication instances to keep, and select the retention time distance and unit. The retention distance unit must be greater than RPO
* **Compress replication traffic:** If you selected Configure settings manually, to apply compression on the replication data traffic for reducing the network data traffic at the expense of CPU, select this option
* **Delay start synchronization:** If you selected Configure settings manually, choose the following option
* To schedule the start of the replication, select this option and enter the local date and time to start the replication.
* To start the replication when the wizard finishes, leave this option deselected.
* **VDC VM placement policy:** Select an organization VDC placement compute policy for the recovered virtual machines
* **Exclude disks:** To select specific hard disks of the virtual machines for replicating to the destination site for reducing the replication data network traffic, select this option
* **Configure Seed VMs :** To select a previous copy of the virtual machines in the destination site for reducing the replication data network traffic, select this option
* **Create a Replication Seed**: Use one of the following methods for creating a seed VM in the destination site
* **Offline data transfer**: Export the VM as an OVF package into removable media and send it to Cloud service administrator imports the package to your cloud organization
* **Copy over the network:** Copy a source VM to the cloud organization and transfer the source data to the destination site by using other means than VMware Cloud Director Availability (FTP, OneDrive, Google Drive, …)
* **Instances**: Select how many rotated instances participate in the current retention rule. The total number of instances in this example matches **the maximum of 24 rotated instances**
* **Distance:** Select the time distance that the rotated instances spread apart in the current retention rule
* **Unit:** Select the time unit for spreading the rotated instances in the current retention rule. Select one from: Minutes – Hours – Days – Weeks – Months – Years
* On the **Disks page** you must select the hard disks to replicate and click **Next**
* On the Ready to complete page, verify that the replication settings of the protection are correct and click **Finish**
{% endtab %}
{% tab title="3. How to Failover, Reverse, or Migrate" %}
* **Diagram for Replication State**
* **Test Failover**: By performing a test failover you can validate that the data from the source site replicates correctly in the destination site
* In the left pane, choose a replication direction
* Select the protected vApp or virtual machine to test the failover and click **All actions > Test Failover**
* On the **Recovery Settings page**, configure the recovered workload and click **Next**
* **Power on recovered vApps**: Select to power on the virtual machines in the destination site after the task completes
* **Network settings:**
* Select *Apply preconfigured network settings on failover*, to assign the network configured during the virtual machine replication
* Select *Connect all VMs to network* and from the drop-down menu select a network to connect the replicated virtual machines to
* On the **Recovery Instance** page, configure the recovery point in time and click **Next**
* *Synchronize all VMs to their current state*: Creates an instance of the power on workload with its latest changes and uses that instance for the test failover
* *Manually select existing instance:* Select an instance without synchronizing the data for the recovered workload
* On the **Ready To Complete** page, review the test details and click **Finish**
* In the **Last changed column**, you can monitor the progress of the test. After the test finishes, for the vApp and its virtual machines in the **Recovery state** column you see a **Test image ready state**
* To Delete the Test Failover results, select the replication to clean. **Click All actions** > **Test Cleanup.**
* The Cleanup Deletes All recovered vApps and virtual machines
* **Perform a Failover Task**: If the protected source site is unavailable, in the destination site perform a workload disaster recovery operation
* Select the protected vApp or virtual machine to fail over and click **All actions > Failover**
* In the **Failover wizard**, configure your selected workload for the failover
* **Consolidate VM disks**: Select this option for a better performance of the recovered virtual machines at the expense of the failover task taking longer to complete
* **Power on recovered vApps**: Select this option to power on the virtual machines on the destination site after the task completes.
* **Network settings:**
* Select *Apply preconfigured network settings on failover*, to assign the network configured during the virtual machine replication
* Select *Connect all VMs to network* and from the drop-down menu select a network to connect the replicated virtual machines to
* On the **Recovery Instance** page, configure the recovery point in time and click **Next**
* On the **Ready To Complete page**, review the task details and click **Finish**
* After the failover task finishes, the failed over workload is running in the destination site and the workload is no longer protected upon the task completion. For the vApp and its virtual machines, in the **Recovery state** column you see a **Failed-Over state**
* **Perform a Reverse Task**:
* After performing failover or migration, return the workload data from the destination site back to the original source site by reversing the replication.
* After failing over or migrating from the source site to the destination site, the workload runs on the destination site. A subsequent reverse task replicates the failed-over or migrated workload data back to the original source protected vApp or virtual machine
* When reversing a replication from a cloud site back to an on-premises site, VMware Cloud Director Availability uses the original datastore for the placement of the workload, regardless of the current on-premises local placement setting
* Select the vApp or the virtual machine that are failed-over and **All actions > Reverse**
* In the **Reverse window**, to confirm the reversal click **Reverse.** Reversing the replication enables the replication traffic and allows the replication to be recovered back to the source
* After the reverse task finishes, the reversed replication overwrites the source vApp or virtual machine. The reversed workload runs in the destination site with a workload protection in the original source site. For the vApp and its virtual machines, in the **Recovery state** column you see a **Reversed state**
* **Perform a Migrate Task**: By migrating an existing replication to a remote organization, the workload runs in the destination site and the source workload is powered off
* Select the protected vApp or virtual machine to migrate over and **All actions > Migrate**
* On the **Migrate Settings** page, configure the recovered workload and click **Next**
* *All source vApps will be powered-off after successful recovery*
* **Consolidate VM disks**: Select this option for a better performance of the recovered virtual machines at the expense of the failover task taking longer to complete
* **Power on recovered vApps**: Select this option to power on the virtual machines on the destination site after the task completes.
* **Network settings:**
* Select *Apply preconfigured network settings on failover*, to assign the network configured during the virtual machine replication
* Select *Connect all VMs to network* and from the drop-down menu select a network to connect the replicated virtual machines to
* On the **Ready To Complete** page, review the task details and click **Finish**
* After a successful recovery, all source **virtual machines** are synchronized and then **powered off**. The migration completes when in the **Recovery state** column of the replication you see **Failed-Over**
* A manual (offline) sync runs. If the source workload is powered on, then it is powered off and a manual sync runs. Then the vApp or virtual machines are recovered on the destination site
{% endtab %}
{% endtabs %}
---
# Agent Instructions
This documentation is published with GitBook. GitBook is the documentation platform designed so that both humans and AI agents can read, navigate, and reason over technical content effectively. Learn more at gitbook.com.
## Querying This Documentation
If you need additional information that is not directly available in this page, you can query the documentation dynamically by asking a question.
Perform an HTTP GET request on the current page URL with the `ask` query parameter, and the optional `goal` query parameter:
```
GET https://docs.higiocloud.vn/hi-gio-draas/how-to-use-vcda-on-premises.md?ask=&goal=
```
`ask` is the immediate question: it should be specific, self-contained, and written in natural language.
`goal` is optional and describes the broader end goal you are ultimately trying to accomplish on behalf of the user. GitBook uses it to tailor the answer towards what is most useful for that goal.
The response will contain a direct answer to the question and relevant excerpts and sources from the documentation.
Use this mechanism when the answer is not explicitly present in the current page, you need clarification or additional context, or you want to retrieve related documentation sections.