All pages
Powered by GitBook
1 of 8

Loading...

Loading...

Loading...

Loading...

Loading...

Loading...

Loading...

Loading...

4. HI GIO API

Tổng quan

Hướng dẫn này được thiết kế để hỗ trợ các nhà phát triển và người dùng kỹ thuật tích hợp và tương tác với các dịch vụ HI GIO Cloud thông qua API mạnh mẽ của chúng tôi.

Trong tài liệu này, bạn sẽ tìm thấy thông tin chi tiết về cách xác thực, thực hiện các cuộc gọi API và xử lý phản hồi một cách hiệu quả. Chúng tôi cũng sẽ cung cấp các thực tiễn tốt nhất, ví dụ mã code và mẹo xử lý sự cố để đảm bảo quá trình tích hợp diễn ra suôn sẻ.

Vui lòng tham khảo hướng dẫn sử dụng VM trong danh sách dưới đây.

  • API tạo VM từ Template

API cấu hình lại Disk của VM
API cấu hình lại Network của VM
API đăng nhập bằng Token
API cấu hình lại Memory của VM
API cấu hình lại CPU của VM
API bật/tắt nguồn VM

API tạo VM từ Template

Tổng quan

  • Trong tài liệu này, bạn sẽ tìm thấy thông tin chi tiết về cách chuẩn bị và tạo VM từ template

  • API này tạo một VM với tên mặc định (tên VM của template), network mặc định "VM Network," và compute và storage mặc định

Quy trình

1

Bước 1: Thu thập thông tin

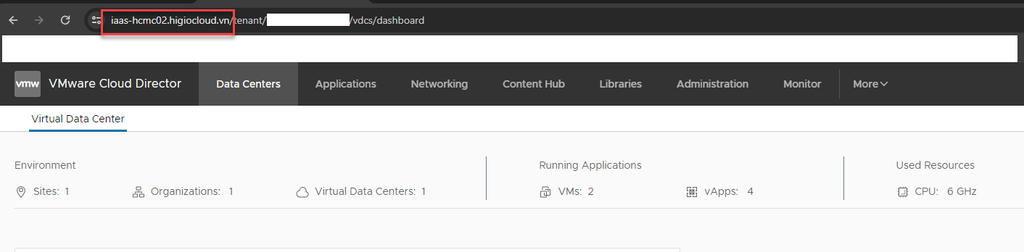
Đăng nhập vào IAM portal -> vCD portal: thu thập thông tin

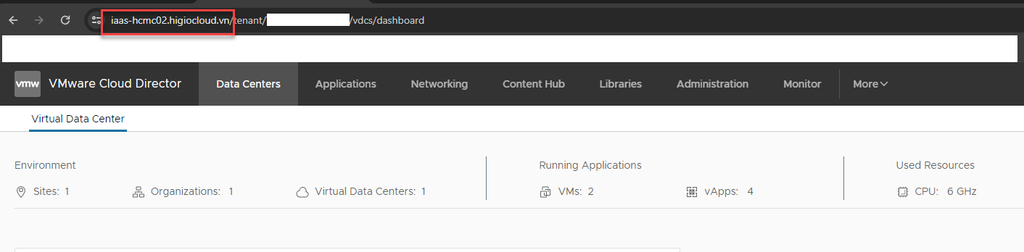
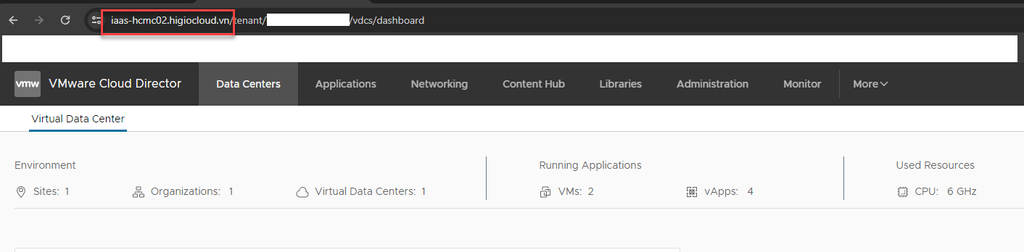
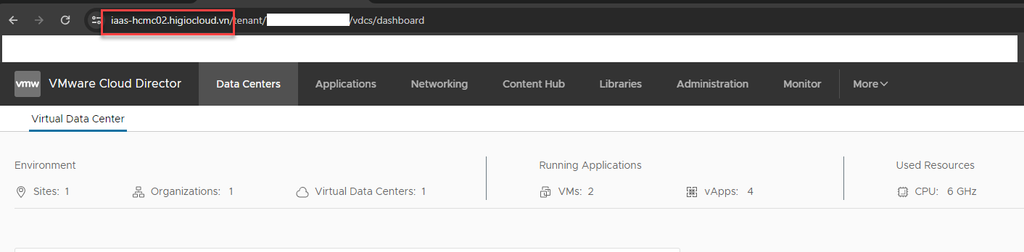
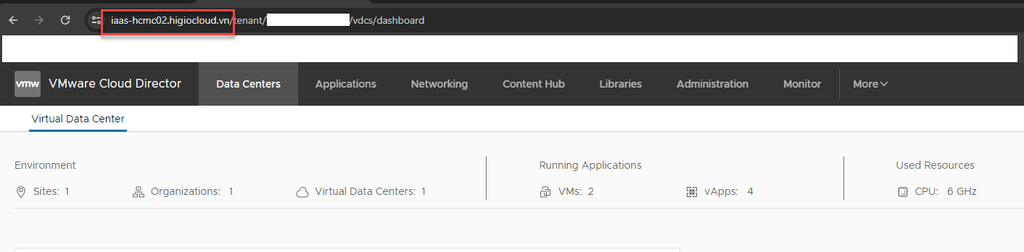
{{vcd_url}}

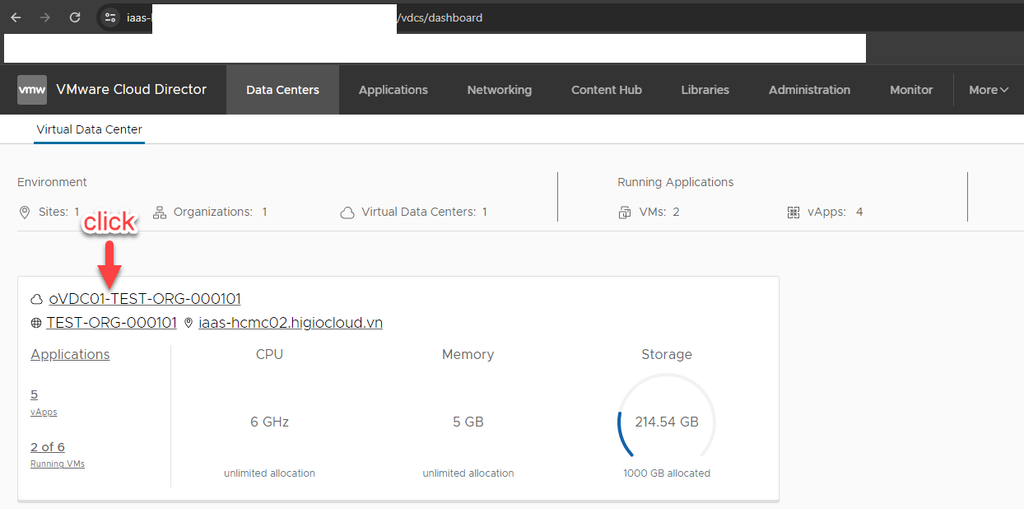
{{vdc_uuid}}: Đăng nhập vào vCD portal -> chọn VDC -> xem và ghi lại vdc_uuid trên URL

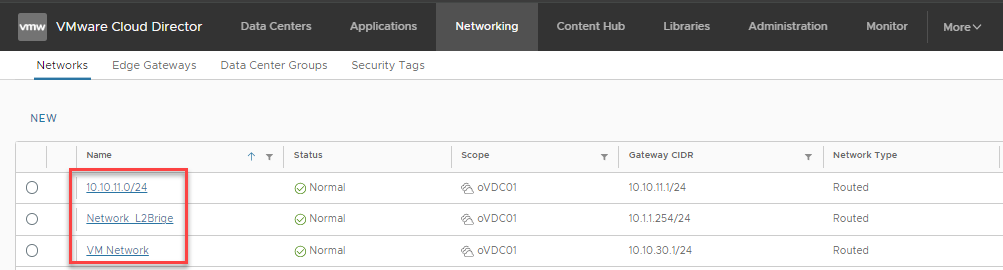
{{network_uuid}}: Trên vCD portal -> Networking -> Networks -> New

Chọn “VM Network” -> và ghi lại thông tin network uuid trên url.

{{vappTemplate_uuid}}: Trên vCD portal -> Content Hub -> Catalogs ->HIGIO Shared Catalogs

-> vApp Templates -> Chọn template mà bạn muốn tạo VM -> ghi lại vappTemplate_uuid trên url.

{{Bearer Token}}: Làm theo hướng dẫn “” .

2

Bước 2: Tạo VM từ template.

Postman:

OST https://{{vcd_url}}/api/vdc

/{{vdc_uuid}}/action/instantiateVAppTemplate

Authorization: {{Bearer Token }}

Headers:

- 'Accept: */*;version=37.2

3

Trên vCD -> Data Center -> Chọn Virtual Data Center của bạn ->vApps -> Kiểm tra vApp và VM của bạn.

API cấu hình lại Memory của VM

Tổng quan

Trong tài liệu này, bạn sẽ tìm thấy thông tin chi tiết về cách chuẩn bị thông tin, lấy thông tin bộ nhớ của VM, và cấu hình lại bộ nhớ của VM.

Quy trình

1

Bước 1: Chuẩn bị thông tin

Đăng nhập vào IAM portal -> vCD portal: thu thập thông tin

  • {{vcd_url}}

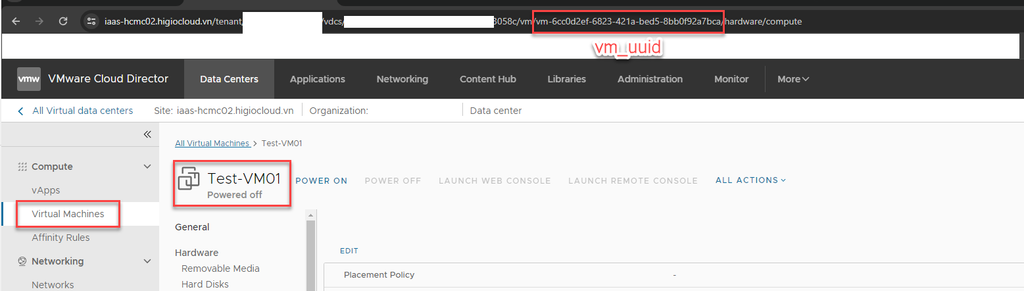
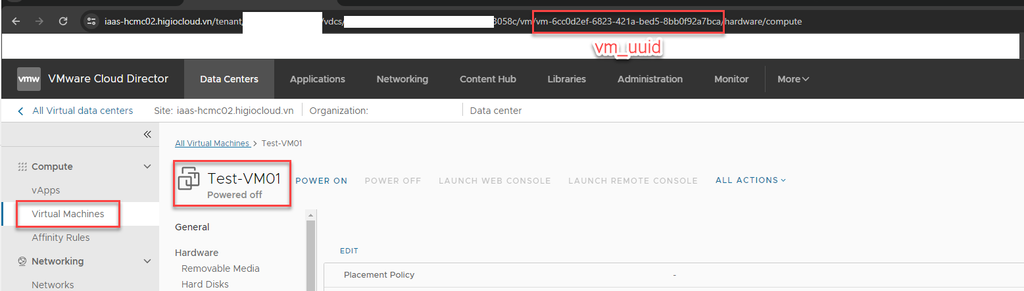
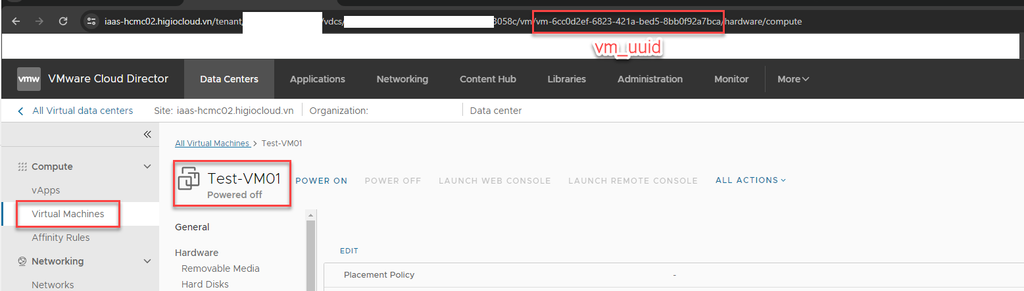
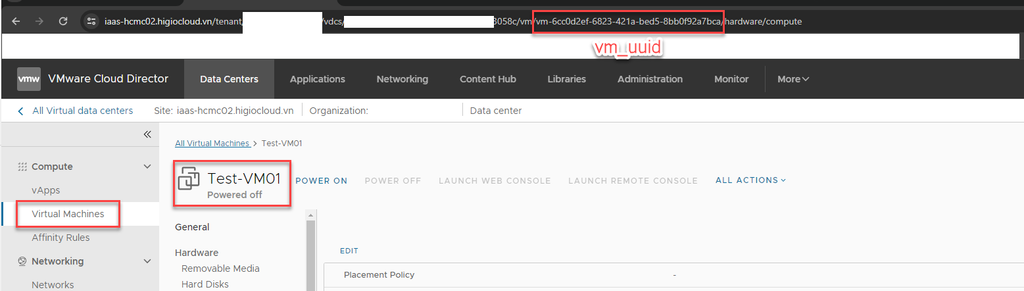
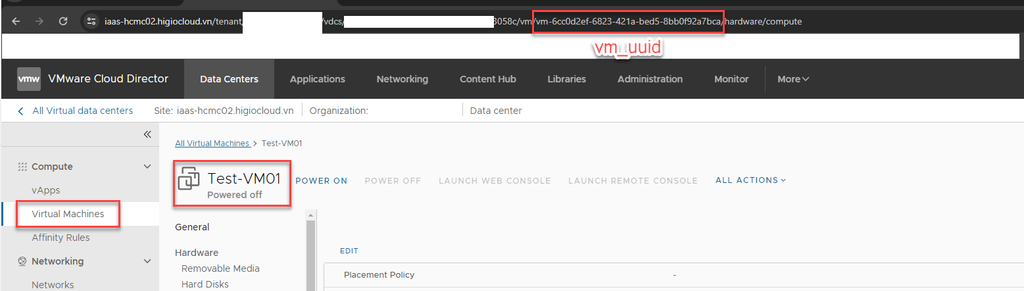
- {{vm-uuid}}: Chọn VM -> xem vm uuid trên url

-{{Bearer Token}}: Vui lòng tham khảo tài liệu ""

2

Bước 2: Lấy thông tin bộ nhớ của VM

  • GET https://{{vcd_url}}/api/vApp/{{vm-uuid}}/virtualHardwareSection/memory

  • Authorization: {{Bearer Token}}

3

Bước 3: Cấu hình lại bộ nhớ của VM

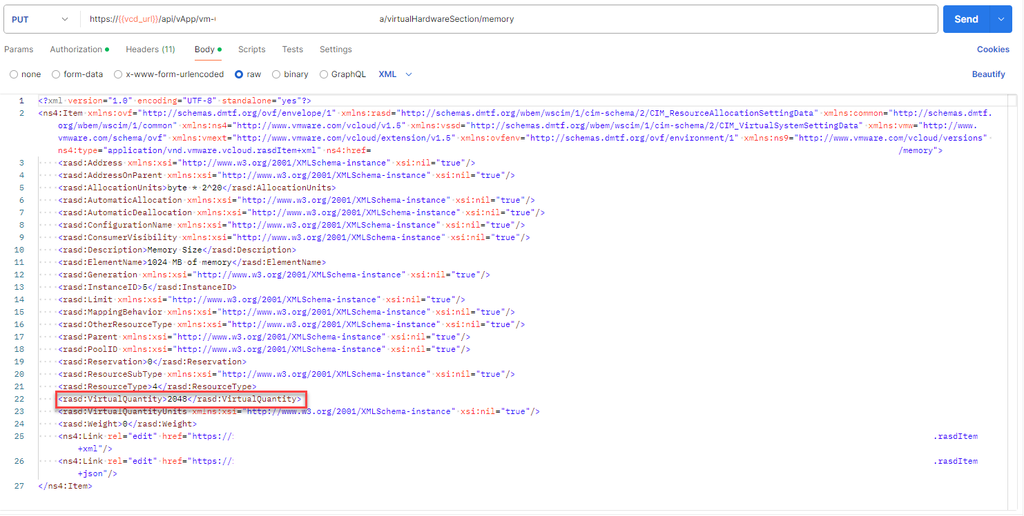
  • PUT https://{{vcd_url}}/api/vApp/{{vm-uuid}}/virtualHardwareSection/memory

  • Authorization: {{Bearer Token }}

4
  • Lấy thông tin bộ nhớ của VM

GET https://{{vcd_url}}/api/vApp/{{vm-uuid}}/virtualHardwareSection/memory

  • Kiểm tra trên vCD portal

Đăng nhập IAM -> vCD portal -> chọn VM -> Compute

API cấu hình lại Disk của VM

Tổng quan

Trong hướng dẫn này, bạn sẽ tìm thấy thông tin chi tiết về cách chuẩn bị thông tin, lấy thông tin đĩa của VM và cấu hình lại đĩa của VM.

Quy trình

1

Bước 1: Chuẩn bị thông tin

Đăng nhập vào IAM portal -> vCD portal: thu thập thông tin

{{vcd_url}}

{{vm-uuid}}: chọn VM -> kiểm tra vm uuid trên URL

{{Bearer Token}}: Vui lòng tham khảo tài liệu “API đăng nhập bằng Token”.

2

Bước 2: Lấy thông tin đĩa của VM

  • GET https://{{vcd_url}}APIi/vApp/{{vm-uuid}}/virtualHardwareSection/disks

  • Authorization: {{Bearer Token}}

3

Bước 3: Cấu hình lại đĩa của VM

  • PUT https//{{vcd_url}}APIi/vApp/{{vm-uuid}}/virtualHardwareSection/disks

  • Authorization: {{Bearer Token }}

4

Bước 4: Xác minh

  • Lấy thông tin đĩa của VM

GET https://{{vcd_url}}/api/vApp/{{vm-uuid}}/virtualHardwareSection/disks

  • Kiểm tra trên vCD portal:

- ‘Content-type’: application/vnd.vmware.vcloud.instantiateVAppTemplateParams+xml; charset=ISO-8859-1

Body: {{Chọn Raw, Sao chép, Dán và Chỉnh sửa code bên dưới}}

SEND request.

Lưu ý tên network phải là "VM Network"

Bước 3: Kiểm tra

Api đăng nhập băng token
<?xml version="1.0" encoding="UTF-8"?>

<vcloud:InstantiateVAppTemplateParams

    xmlns:ovf="http://schemas.dmtf.org/ovf/envelope/1"

    xmlns:vcloud="http://www.vmware.com/vcloud/v1.5"

    deploy="false"

    name="your vapp name"

    powerOn="false">

    <vcloud:Description>VApp Description</vcloud:Description>

    <vcloud:InstantiationParams>

        <vcloud:NetworkConfigSection>

            <ovf:Info>NetInfo</ovf:Info>

            <vcloud:NetworkConfig networkName="VM Network">

                <vcloud:Configuration>

                    <vcloud:ParentNetwork

                        href="https:// {{vcd_url}}/api/network/{{network_uuid}}"

                        name="VM Network"

                        type="application/vnd.vmware.vcloud.network+xml"/>

                    <vcloud:FenceMode>bridged</vcloud:FenceMode>

                </vcloud:Configuration>

            </vcloud:NetworkConfig>

        </vcloud:NetworkConfigSection>

    </vcloud:InstantiationParams>

    <vcloud:Source

        href="https://{{vcd_url}}/api/vAppTemplate/{{vappTemplate_uuid}}"

        name="HIGIO"

        type="application/vnd.vmware.vcloud.vAppTemplate+xml"/>

</vcloud:InstantiateVAppTemplateParams>
Headers:

- ‘Accept’: */*;version=37.2

- ‘Content-type’: application/vnd.vmware.vcloud.rasdItem+xml

  • SEND request.

Copy Response Body

Headers:

-'Accept: /;version=37.2

-‘Content-type’: application/vnd.vmware.vcloud.rasdItem+xml

Body: {{select raw -> copy and paste response body from Get VM’s memory information }}

Ex:

==============================================================================

Tìm dòng “<rasd:VirtualQuantity>2048</rasd:VirtualQuantity>” và chỉnh sửa giá trị, đây là bộ nhớ của VM (MB). Lưu ý rằng giá trị phải là bội số của 4 MB.

  • SEND request.

Bước 4: Xác minh

API đăng nhập bằng Token

<?xml version="1.0" encoding="UTF-8" standalone="yes"?>
<ns4:Item xmlns:ovf="http://schemas.dmtf.org/ovf/envelope/1" xmlns:rasd="http://schemas.dmtf.org/wbem/wscim/1/cim-schema/2/CIM_ResourceAllocationSettingData" xmlns:common="http://schemas.dmtf.org/wbem/wscim/1/common" xmlns:ns4="http://www.vmware.com/vcloud/v1.5" xmlns:vssd="http://schemas.dmtf.org/wbem/wscim/1/cim-schema/2/CIM_VirtualSystemSettingData" xmlns:vmw="http://www.vmware.com/schema/ovf"
………………………………………………………….
……………………………………………………………
    <rasd:ResourceType>4</rasd:ResourceType>
    <rasdraidtualQuantity>2048</rasd:VirtualQuantity>
    <rasd:VirtualQuantityUnits xmlns:xsi="http://www.w3.org/2001/XMLSchema-instance" xsi:nil="true"/>
type="application/vnd.vmware.vcloud.rasdItem+json"/>
</ns4:Item>
Headers:

- ‘Accept’: */*;version=37.2

- ‘Content-type’: application/vnd.vmware.vcloud.rasdItem+xml

Headers:

- 'Accept’: */*;version=37.2

- ‘Content-type’: application/vnd.vmware.vcloud.rasdItem+xml

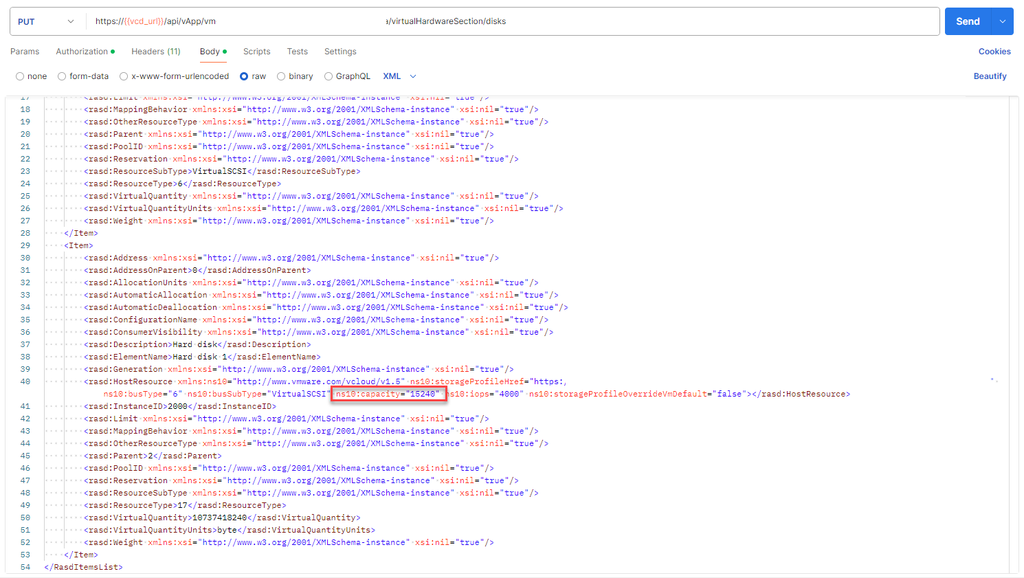
  • Body: {{select raw -> copy and paste response body from Get VM’s disk information }}

Ex:

  • Tìm từ ns10:capacity và chỉnh sửa giá trị của nó (đơn vị MB).

  • SEND request.

Đăng nhập IAM -> vCD portal -> chọn VM -> Hard disk

<?xml version="1.0" encoding="UTF-8" standalone="yes"?>
<RasdItemsList xmlns="http://www.vmware.com/vcloud/v1.5" xmlns:vmext="http://www.vmware.com/vcloud/extension/v1.5" xmlns:ovf="http://schemas.dmtf.org/ovf/envelope/1"
…………………………………………….
………………………………………
        <rasd:HostResource xmlns:ns10="http://www.vmware.com/vcloud/v1.5" ns10:storageProfileHref="https://iaas-hcmc02.higiocloud.vn/api/vdcStorageProfile/a7c6c2f7-3c2211e6e7b0" ns10:busType="6" ns10:busSubType="VirtualSCSI" ns10:capacity="15240" ns10:iops="4000" ns10:storageProfileOverrideVmDefault="false"></rasd:HostResource>
        <rasd:InstanceID>2000</rasd:InstanceID>
        <rasd:Limit xmlns:xsi="http://www.w3.org/2001/XMLSchema-instance" xsi:nil="true"/>
        <rasd:MappingBehavior xmlns:xsi="http://www.w3.org/2001/XMLSchema-instance" xsi:nil="true"/>
        <rasd:OtherResourceType xmlns:xsi="http://www.w3.org/2001/XMLSchema-instance" xsi:nil="true"/>
        <rasd:Parent>2</rasd:Parent>
    </Item>
</RasdItemsList>

API đăng nhập bằng Token

Trong tài liệu này, bạn sẽ tìm thấy thông tin chi tiết về cách chuẩn bị thông tin, tạo Token trên vCD portal, và tạo Bearer token.

1

Bước 1: Chuẩn bị thông tin

Đăng nhập vào IAM portal -> vCD portal: thu thập thông tin

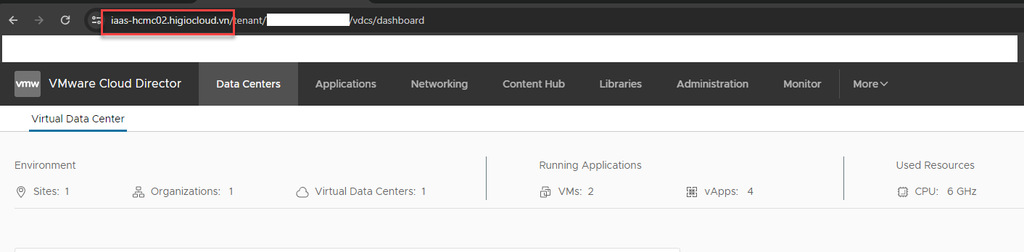
  • {{vcd_url}}

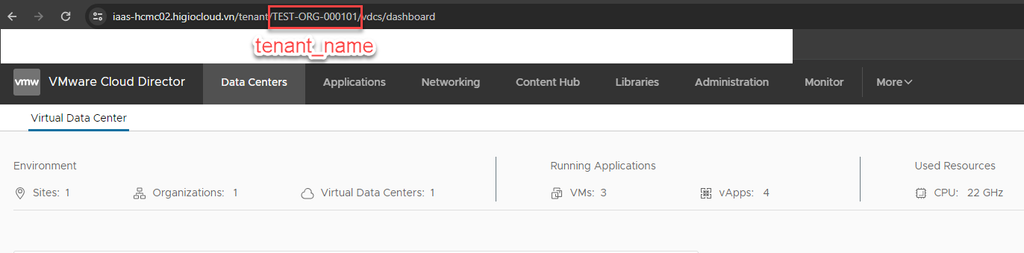
  • {{tenant_name}}

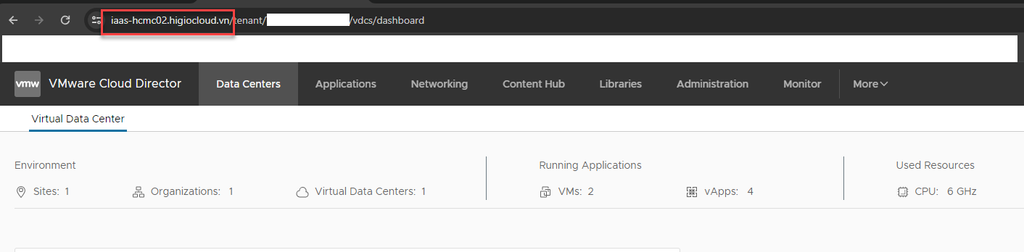
  • Ex: https://iaas-hcmc02.higiocloud.vn/tenant/”tenant_name”/vdcs/dashboard

    2

    Bước 2: Tạo Token trên vCD portal

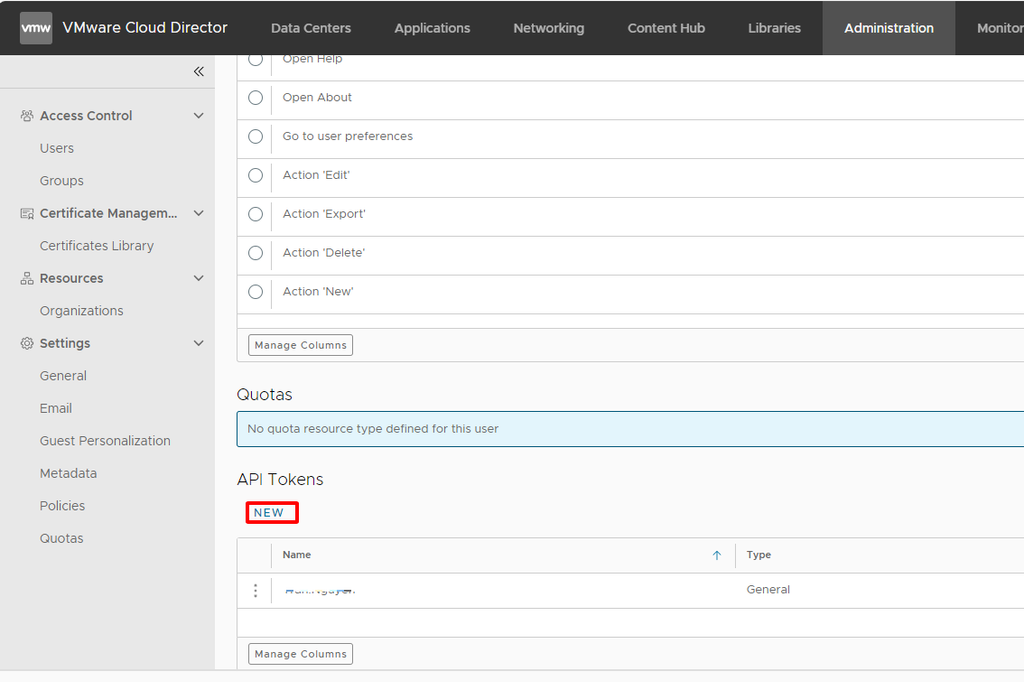
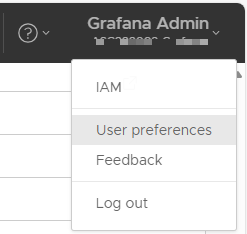
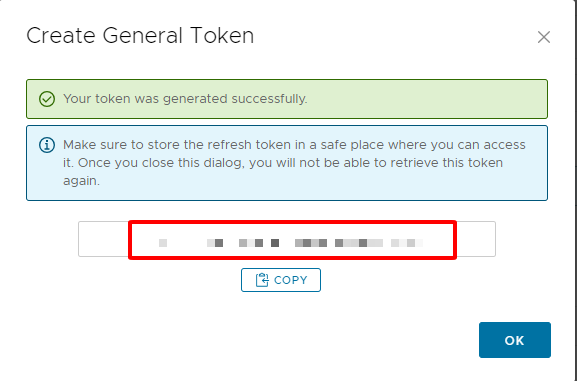
    • Đăng nhập vào IAM portal -> vCD portal -> User preferences

    • API tokens -> New

    Sao chép token ({{api-token-generated}})

    3

    Bước 3: Tạo Bearer token

    • POST https://{{vcd_url}}/oauth/tenant/{{tenant_name}}/token

    • Authorization: No Auth

    • Headers:

    - 'Accept: application/json'

    - 'Content-Type: application/x-www-form-urlencoded'

    • Body:

    raw: 'grant_type=refresh_token&refresh_token={{api-token-generated}}'

    • SEND request.

    Response body: "access_token" (Bearer token)

    Tổng quan

    Quy trình

    API bật/tắt nguồn VM

    Tổng quan

    Trong tài liệu này, bạn sẽ tìm thấy thông tin chi tiết về cách chuẩn bị thông tin, lấy trạng thái của VM, và thay đổi trạng thái của VM.

    Quy trình

    1

    Bước 1: Chuẩn bị thông tin

    Đăng nhập vào IAM portal -> vCD portal: thu thập thông tin

    • {{vcd_url}}

    • {{vm-uuid}}: select VM -> take a look vm uuid on url

    • {{Bearer Token}}: Vui lòng tham khảo tài liệu “”

    2

    Bước 2: Lấy trạng thái của VM

    • GET https://{{vcd_url}}/api/vApp/{{vm_uuid}}

    • Authorization: {{Bearer Token }}

    3

    Bước 3: Thay đổi trạng thái của VM

    • POST https://{{vcd_url}}/api/vApp/{{vm_uuid}}/power/action/{{powerOn/powerOff}}

    • Authorization: {{Bearer Token}}

    4

    Bước 4: Xác minh

    • Lấy thông tin trạng thái của VM

    GET https://{{vcd_url}}/api/vApp/{{vm-uuid}}

    • Kiểm tra trên vCD portal

    Headers:

    - ‘Accept’: */*;version=37.2

    • SEND request.

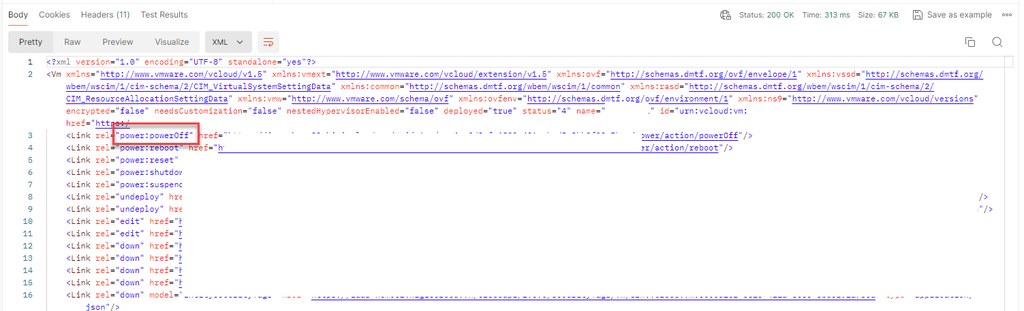
    Kiểm tra trạng thái VM trên dòng thứ 3 của Response Body. Nếu Link rel="power:powerOff", VM đang bật; nếu không, VM đang tắt.

    Headers:

    - ‘Accept’: */*;version=37.2

    • SEND request.

    Đăng nhập IAM -> vCD portal -> chọn VM
    API đăng nhập bằng Token

    API cấu hình lại Network của VM

    Tổng quan

    Trong tài liệu này, bạn sẽ tìm thấy thông tin chi tiết về cách chuẩn bị thông tin, lấy thông tin mạng của VM và cấu hình lại mạng của VM.

    Quy trình

    1

    Bước 1: Chuẩn bị thông tin

    Đăng nhập vào IAM portal -> vCD portal: thu thập thông tin

    {{vcd_url}}

    {{vm-uuid}}: chọn VM -> kiểm tra vm uuid trên URL

    {{network_name}}: Chọn Networking -> Networks -> Sao chép tên mạng

    {{Bearer Token}}: Vui lòng tham khảo tài liệu “API token login”

    2

    Bước 2: Lấy thông tin mạng của VM

    • GET https://{{vcd_url}}/api/vApp/{{vm-uuid}}/virtualHardwareSection/networkCards

    • Authorization: {{Bearer Token}}

    3

    Bước 3: Cấu hình lại mạng của VM

    • PUT https//{{vcd_url}}/api/vApp/{{vm-uuid}}/virtualHardwareSection/networkCards

    • Authorization: {{Bearer Token }}

    4

    Bước 4: Xác minh

    • Lấy thông tin mạng của VM

    GET https://{{vcd_url}}/api/vApp/{{vm-uuid}}/virtualHardwareSection/networkCards

    API cấu hình lại CPU của VM

    Trong tài liệu này, bạn sẽ tìm thấy thông tin chi tiết về cách chuẩn bị thông tin, lấy thông tin CPU của VM, và cấu hình lại CPU của VM.

    1

    Bước 1: Chuẩn bị thông tin

    Đăng nhập vào IAM portal -> vCD portal: thu thập thông tin

    • {{vcd_url}}

    Headers:

    - ‘Accept’: */*;version=37.2

    - ‘Content-type’: application/vnd.vmware.vcloud.rasdItem+xml

    • SEND request.

    Copy Response Body

    Headers:

    - 'Accept’: */*;version=37.2

    - ‘Content-type’: application/vnd.vmware.vcloud.rasdItemsList+xml; charset=ISO-8859-1

    Body: {{select raw -> copy and paste response body from Get VM’s networks information }}

    Ex:

    =====================================================================

    Tìm từ :

    ns10:ipAddressingMode và chỉnh sửa giá trị trong “ ” (network mode: “DHCP”, “Pool”, “Manual”)

    + DHCP: Vui lòng thiết lập DHCP pool trên mạng của bạn -> The IP Management

    + Pool: Vui lòng thiết lập Static IP pools trên mạng của bạn-> IP Management

    ns10:ipAddress và chỉnh sửa giá trị trong “ ” (“VM ipv4 address”) – không cần nếu sử dụng DHCP hoặc Pool

    ns10:primaryNetworkConnection và chỉnh sửa giá trị trong “ ” (dán tên mạng {{netwok_name}} )

    • SEND request.

    Kiểm tra trên vCD portal:

    Login IAM -> vCD portal-> select VM-> NICs

    <?xml version="1.0" encoding="UTF-8" standalone="yes"?>
    <RasdItemsList xmlns="http://www.vmware.com/vcloud/v1.5" xmlns:vmext="http://www.vmware.com/vcloud/extension/v1.5" xmlns:ovf="http://schemas.dmtf.org/ovf/envelope/1" xmlns:vssd="http://schemas.dmtf.org/wbem/wscim/1/cim-schema/2/CIM_VirtualSystemSettingData"
    …………………………………..
    ………………………………….
        <Link rel="edit" href="https://iaas-hcmc02.higiocloud.vn/api/vApp/vm-6cc0d2ef-6823-421a-bed5-8bb0f92a7bca/virtualHardwareSection/networkCards" type="application/vnd.vmware.vcloud.rasdItemsList+json"/>
        <Item>
            <rasd:Address>00:50:56:02:10:2c</rasd:Address>
            <rasd:AddressOnParent>0</rasd:AddressOnParent>
            <rasd:AllocationUnits xmlns:xsi="http://www.w3.org/2001/XMLSchema-instance" xsi:nil="true"/>
            <rasd:AutomaticAllocation>true</rasd:AutomaticAllocation>
            <rasd:AutomaticDeallocation xmlns:xsi="http://www.w3.org/2001/XMLSchema-instance" xsi:nil="true"/>
            <rasd:ConfigurationName xmlns:xsi="http://www.w3.org/2001/XMLSchema-instance" xsi:nil="true"/>
            <rasd:Connection xmlns:ns10="http://www.vmware.com/vcloud/v1.5" ns10:ipAddressingMode="Manual" ns10:ipAddress="10.10.11.20" ns10:primaryNetworkConnection="true">10.10.11.0/24</rasd:Connection>
            <rasd:ConsumerVisibility xmlns:xsi="http://www.w3.org/2001/XMLSchema-instance" xsi:nil="true"/>
            …………………………………………………………………….
            <rasd:ResourceSubType>VMXNET3</rasd:ResourceSubType>
            <rasd:ResourceType>10</rasd:ResourceType>
            <rasd:VirtualQuantity xmlns:xsi="http://www.w3.org/2001/XMLSchema-instance" xsi:nil="true"/>
            <rasd:Weight xmlns:xsi="http://www.w3.org/2001/XMLSchema-instance" xsi:nil="true"/>
        </Item>
    </RasdItemsList>
  • {{vm-uuid}}: Chọn VM -> xem vm uuid trên url.

  • {{Bearer Token}}: Vui lòng tham khảo tài liệu "API đăng nhập bằng Token"

  • 2

    Bước 2: Lấy thông tin CPU của VM

    • GET https://{{vcd_url}}/api/vApp/{{vm-uuid}}/virtualHardwareSection/cpu

    • Authorization: {{Bearer Token }}

    • Headers:

    - ‘Accept’: */*;version=37.2

    - ‘Content-type’: application/vnd.vmware.vcloud.rasdItem+xml

    • SEND request.

    Copy Response Body

    3

    Bước 3: Cấu hình lại CPU của VM

    Postman:

    • PUT https://{{vcd_url}}/api/vApp/{{vm-uuid}}/virtualHardwareSection/cpu

    • Authorization: {{Bearer Token }}

    • Headers:

    - 'Accept: */*;version=37.2

    - ‘Content-type’: application/vnd.vmware.vcloud.rasdItem+xml

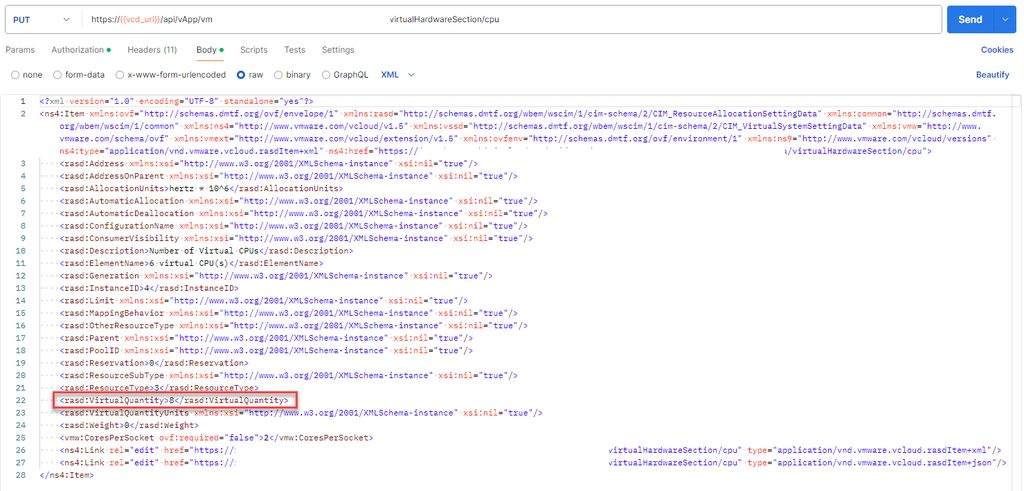
    Body: {{select raw -> copy and paste response body from Get VM’s CPU information }}

    Ex:

    ==============================================================================

    Tìm dòng “<rasd:VirtualQuantity>8</rasd:VirtualQuantity>” và chỉnh sửa số, đây là số CPU của VM.

    • SEND request.

    4

    Bước 4: Xác minh

    • Lấy thông tin CPU của VM

    GET https://{{vcd_url}}/api/vApp/{{vm-uuid}}/virtualHardwareSection/cpu

    • Kiểm tra trên vCD portal

    Đăng nhập IAM -> vCD portal -> chọn VM -> Compute

    Tổng quan

    Quy trình

    <?xml version="1.0" encoding="UTF-8" standalone="yes"?>
    <ns4:Item xmlns:ovf="http://schemas.dmtf.org/ovf/envelope/1" xmlns:rasd="http://schemas.dmtf.org/wbem/wscim/1/cim-schema/2/CIM_ResourceAllocationSettingData" xmlns:common="http://schemas.dmtf.org/wbem/wscim/1/common" xmlns:ns4="http://www.vmware.com/vcloud/v1.5"
        <rasd:Reservation>0</rasd:Reservation>
        <rasd:ResourceSubType xmlns:xsi="http://www.w3.org/2001/XMLSchema-instance" xsi:nil="true"/>
        <rasd:ResourceType>3</rasd:ResourceType>
    …………………………………………………………………………..
    ………………………………………………………………………….
        <rasd:VirtualQuantity>8</rasd:VirtualQuantity>
        <rasd:VirtualQuantityUnits xmlns:xsi="http://www.w3.org/2001/XMLSchema-instance" xsi:nil="true"/>
        <rasd:Weight>0</rasd:Weight>
        <vmw:CoresPerSocket ovf:required="false">2</vmw:CoresPerSocket>
    type="application/vnd.vmware.vcloud.rasdItem+json"/>
    </ns4:Item>